Utilities
Contents
Utilities#
In this section we will compile a list of useful utility functions, tools and examples of their usage. These functions are part of OSP-core and are used as an extension of the main API.
pico#
Our tool for installing ontologies is called pico.
It is a recursive acronym that stands for Pico Installs Cuds Ontologies.
There are 3 main operations that can be done with pico:
Install ontologies.
List the installed ontologies.
Remove installed ontologies.
pico can be used both from the command-line
and as a Python module within the Python shell.
Using pico from the command line#
There are different possible logging levels available, and they can be set via
--log-level <ERROR|WARNING|INFO|DEBUG>. The default value is INFO.
pico installs#
Usage:
pico install <path/to/ontology_yml_file.yml>pico install <path/to/ontology_yml_file1.yml> <path/to/ontology_yml_file2.yml> ...pico install city foaf emmo dcat2(the installation of these specific well-known ontologies is available via this shortcut)
Behaviour:
The ontology file is parsed, and the entities mapped to Python objects.
The Python objects can be imported via their namespace
from osp.core.namespaces import namespace.
Example:
(venv) user@PC:~$ pico install city
INFO [osp.core.ontology.installation]: Will install the following namespaces: ['city']
INFO [osp.core.ontology.yml.yml_parser]: Parsing YAML ontology file /.../osp-core/osp/core/ontology/docs/city.ontology.yml
INFO [osp.core.ontology.yml.yml_parser]: You can now use `from osp.core.namespaces import city`.
INFO [osp.core.ontology.parser]: Loaded 367 ontology triples in total
INFO [osp.core.ontology.installation]: Installation successful
pico lists#
Usage: pico list
Behaviour:
The installed namespaces and packages are printed out. A package can be uninstalled and can contain many namespaces. A namespace can be imported within the Python shell.
Example:
Packages:
        - qe
        - city
Namespaces:
        - xml
        - rdf
        - rdfs
        - xsd
        - cuba
        - owl
        - qe
        - city
pico uninstalls#
Usage:
pico uninstall <package>pico uninstall all
Behaviour:
The specified packages are uninstalled.
All packages except the uninstalled ones are re-installed.
Example:
(venv) user@PC:~$ pico uninstall city
INFO [osp.core.ontology.installation]: Will install the following namespaces: ['qe']
INFO [osp.core.ontology.yml.yml_parser]: Parsing YAML ontology file /home/<username>/.osp_ontologies/qe.yml
INFO [osp.core.ontology.yml.yml_parser]: You can now use `from osp.core.namespaces import qe`.
INFO [osp.core.ontology.parser]: Loaded 205 ontology triples in total
INFO [osp.core.ontology.installation]: Uninstallation successful
Conflicts with other “pico” installations#
Some Operating Systems might have a pre-existing tool called pico. In most cases, the previous commands should work, but if any problem arises, you can use the following alternative:
python -m osp.core.pico <command>
For example:
python -m osp.core.pico install city
Using pico as a Python module#
pico can also be used within the Python shell. In particular, four
functions are available to be imported from the osp.core.pico module,
from osp.core.pico import install, namespaces, packages, uninstall
that cover the three main operations that pico is meant to perform: installing
ontologies (install), uninstalling ontologies (uninstall), and listing the
installed ontologies (packages, namespaces).
Each function is used in a similar way to its command-line counterpart.
install: accepts one or more positional arguments of string type, which can be either paths toymlontology installation files or names of ontologies that can be installed via this shortcut. It is meant to clone the behavior of its command-line counterpart.uninstall: accepts one or more positional arguments of string type, which must be names of already installed ontology packages. It also clones the behavior of its command-line counterpart.packages: accepts no arguments and returns an iterator over the names of the installed packages.namespaces: accepts no arguments and returns an iterator yielding oneOntologyNamespaceobject for each installed namespace.
Usage examples:
install('city', 'path/to/ontology_yml_file.yml'),install('foaf', 'dcat2')uninstall('city', 'foaf')print(list(packages()))print(list(namespaces()))
Ontology installation folder#
The installed ontologies are stored in the directory ~/.osp-ontologies by
default. On Windows, ~ usually refers to the path
C:\Users\<my username>.
The installation directory can be changed by setting the
environment variable OSP_ONTOLOGIES_DIR. Such action would move it to
$OSP_ONTOLOGIES_DIR/.osp-ontologies.
Tips and tricks#
The following are some utility functions and shortcuts for working with cuds.
For those that are present in the util package, the import is from osp.core import utils.
utils.get_relationships_between(a, b)returns a set with the relationships that connectaandb.a.get_attributes()returns a dictionary with the name and the value of the attributes ofa.a.is_a(oclass)is True if the instanceais or inherits fromoclass.osp.core.get_entity("namespace.entity")returns the class associated with anentityin anamespace. It can be used to instantiate objects.[attr.argname for attr in oclass.attributes.keys()]returns a list with the attributes of anoclass.[attr.namespace for attr in oclass.attributes.keys()]returns a list with the namespace of the attributes of anoclass.
Visualisation#
There are two ways of visualising information about a Cuds structure, one as a text output to the standard output (pretty print), and another one as a dot graph (cuds2dot).
Another useful dot graph visualisation tool called ontology2dot is available for ontology YML files.
Warning
The graphic visualisation tools that generate a dot file require Graphviz to be installed in the system.
Pretty print#
Location: from osp.core.utils import pretty_print.
Usage: pretty_print(cuds_object)
Behaviour:
The UUID, oclass and attributes of the given object are printed.
All the related objects are also printed in a recursive fashion.
The relationship to the contained objects is stated.
Example:
>>> pretty_print(emmo_town)
Cuds object named <EMMO town>:
  uuid: 06b01f5a-e8c1-44a5-962d-ea0c726e97d0
  type: city.City
  superclasses: city.City, city.PopulatedPlace, city.GeographicalPlace, cuba.Entity
  values: coordinates: [42 42]
  description:
    To Be Determined

   |_Relationship city.hasInhabitant:
   | -  city.Citizen cuds object named <Emanuele Ghedini>:
   | .  uuid: f1bd9143-6472-4b24-94b5-1c5fc4c6e5b6
   | .  age: 25
   | -  city.Citizen cuds object named <Adham Hashibon>:
   | .  uuid: 3b774c96-1a0c-403b-b0d0-05d6cd38c52c
   | .  age: 25
   | -  city.Citizen cuds object named <Jesper Friis>:
   | .  uuid: 40d2335c-a335-4d07-b142-fb2b9b7581a7
   | .  age: 25
   | -  city.Citizen cuds object named <Gerhard Goldbeck>:
   | .  uuid: a5b9282a-ec10-462d-9aa1-9671d8bbe236
   | .  age: 25
   | -  city.Citizen cuds object named <Georg Schmitz>:
   | .  uuid: c7c87209-660f-4a54-9c37-7e50c3164bc9
   | .  age: 25
   | -  city.Citizen cuds object named <Anne de Baas>:
   |    uuid: d74cfbae-9699-4998-a1e2-8f495a874ced
   |    age: 25
   |_Relationship city.hasPart:
     -  city.Neighborhood cuds object named <Ontology>:
     .  uuid: 26c4767d-c0ea-4abb-b7b7-7e8702de5de3
     .  coordinates: [0 0]
     .   |_Relationship city.hasPart:
     .     -  city.Street cuds object named <Relationships>:
     .     .  uuid: 23b0ba0d-1601-4824-b6c7-7eb3fdc05a91
     .     .  coordinates: [0 0]
     .     -  city.Street cuds object named <Entities>:
     .        uuid: b69d40d0-b919-4df8-8334-b898e4beda83
     .        coordinates: [0 0]
     -  city.Neighborhood cuds object named <User cases>:
        uuid: 79a214f6-4eb1-4a3b-8908-306129583da1
        coordinates: [0 0]
Cuds2Dot#
Location: from osp.core.utils import Cuds2dot.
Usage: Cuds2dot(cuds_object).render()
Behaviour:
Each entity is represented by a node.
The relationships are the edges connecting them.
The attributes, uuid and oclass are written inside the nodes.
Example:
>>> Cuds2dot(emmo_town).render()

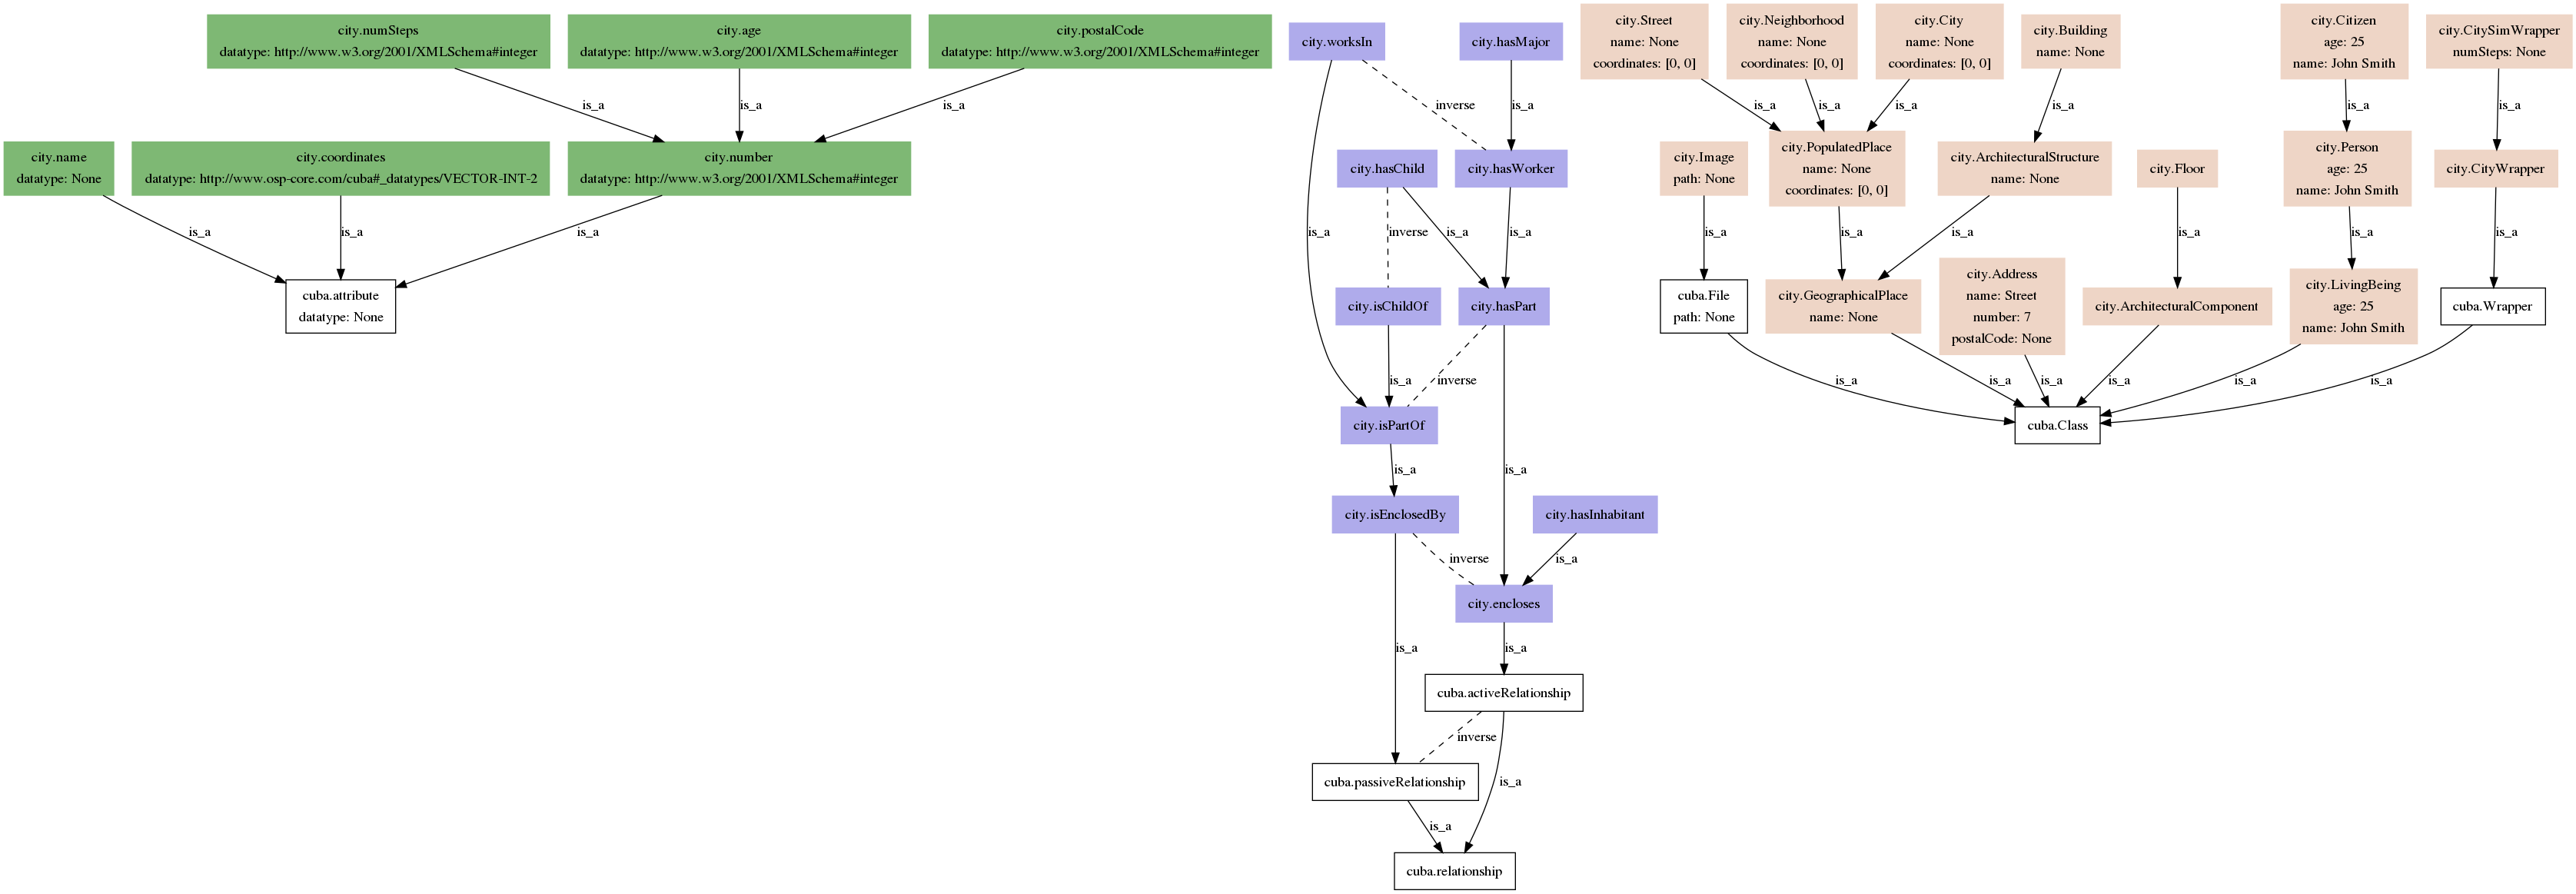
Ontology2Dot#
Location: console entry point osp.core.tools.ontology2dot.
Usage: ontology2dot
Behaviour:
Each ontology entity is represented by a box.
Attributes and their default values are stated.
Inheritance of entities is shown via is_a.
The inverse of each relationship is also represented.
Example:
ontology2dot osp/core/ontology/yml/ontology.city.yml
Search#
To make searching (in-depth) for a particular cuds object easier, we have implemented some simple search utility functions.
Simple search#
Location: import osp.core.utils.simple_search
Usage:
find_cuds_object(criterion, root, rel, find_all, max_depth=float("inf"), current_depth=0, visited=None)finds a cuds object underroot, related viarelthat returnsTrueforcriterion(boolean function). Iffind_allis set toTrue, it will return all elements, and not only the first found.find_cuds_object_by_uid(uid, root, rel)finds an element with given uid inside a cuds object by considering the given relationship.find_cuds_objects_by_oclass(oclass, root, rel)finds an element with given oclass inside a cuds object by considering the given relationship.find_cuds_objects_by_attribute(attribute, value, root, rel)finds a cuds object by attribute and value by only considering the given relationship.find_relationships(find_rel, root, consider_rel, find_sub_rels=False)finds the given relationship in the subtree of the given root.
Examples:
To find all the inhabitants in a city with a given name:
queried_name = 'Pablo'
search.find_cuds_object(criterion = lambda x: queried_name in x.name,
                        root=city_cuds,
                        rel=city.hasInhabitant,
                        find_all=True)
To find an object when the uid and relationship are known:
queried_uid = uuid.uuid4()
search.find_cuds_object_by_uid(uid=queried_uid,
                               root=city_cuds,
                               rel=city.get_default_rel())
To find all the streets that are part of a city:
search.find_cuds_objects_by_oclass(oclass=city.Street,
                                   root=city_cuds,
                                   rel=city.hasPart)
To find all the inhabitants with an attribute
agewith value26:search.find_cuds_objects_by_attribute(attribute='age', value=26, root=city_cuds, rel=city.hasInhabitant)
Serialization JSON schema of CUDS objects#
When you serialize a CUDS object using the
serialize() method in the utils module,
you will get a json document as a result.
The method will traverse the hierarchical datastructure
using Depth First Traversal.
Therefore, its result is a json array composed of several flat CUDS objects.
This array can later be deserialized using the opposite
deserialize.
The serialization is done via JSON-LD, with the schema used for the OSP API in Marketplace.